Ombre Nails: Enhance Your Nail Extensions with Stunning Gradient Effects
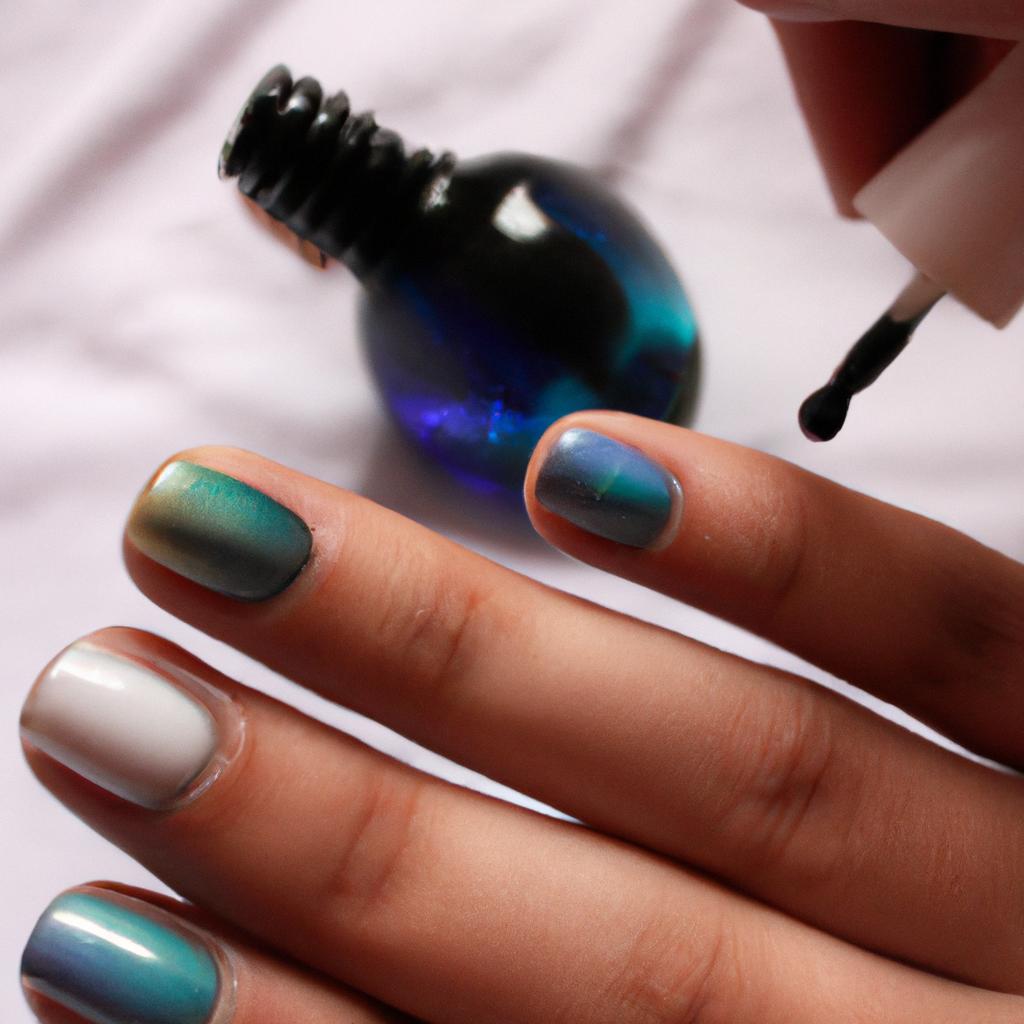
Ombre nails have become a popular trend in the world of nail art, offering an exciting way to enhance your nail extensions with stunning gradient effects. This technique involves blending two or more colors seamlessly on each individual nail, creating a visually captivating and unique look. For instance, imagine walking into a room adorned with elegant ombre nails that transition from a deep midnight blue at the tips to a soft baby pink near the cuticles. The eye-catching effect of these gradient designs adds depth and dimension to your manicure, making it stand out among traditional solid-colored options.
In recent years, ombre nails have gained significant attention due to their versatility and ability to complement various styles and occasions. Whether you are attending a formal event or simply want to add some flair to your everyday look, ombre nails can be tailored to suit any aesthetic preference. Moreover, this technique allows for endless possibilities when it comes to color combinations – from vibrant neons for summer vibes to subtle pastels for an understated elegance. By incorporating ombre nails into your nail extension routine, you can effortlessly elevate your overall appearance while expressing your personal style through artistic and tasteful fashion statements.
What are ombre nails and how are they achieved?
Ombre nails have become a popular trend in the world of nail art, offering a stunning gradient effect that adds depth and dimension to your nail extensions. This technique involves blending two or more colors seamlessly from light to dark or vice versa, creating a beautiful transition on each individual nail.
To achieve ombre nails, several methods can be employed depending on personal preference and skill level. One common approach is using a sponge technique where different shades of polish are applied onto a makeup sponge and then dabbed onto the nail surface. By gently pressing and rolling the sponge across the nail, the colors blend together effortlessly, resulting in a smooth ombre effect.
Another method includes using an ombre brush or tool specifically designed for this purpose. With these tools, multiple shades of polish are painted directly onto the brush bristles and then brushed onto the nail in long strokes. This technique requires some practice to master but offers precise control over color placement.
Achieving flawless ombre nails requires attention to detail and careful execution. Here are some tips to keep in mind when attempting this technique:
- Start with clean, well-prepped nails: Ensure that your natural nails or extensions are properly filed, buffed, and free from any oils or residue before beginning the ombre process.
- Choose complementary colors: Select hues that blend harmoniously together to create a visually pleasing gradient effect. Consider contrasting combinations like pink and purple or blue and green for added impact.
- Blend gradually: Take your time while applying the colors, ensuring that you smoothly transition from one shade to another without any noticeable lines or harsh edges.
- Seal it with topcoat: Once you’ve achieved your desired ombre look, seal it with a high-quality topcoat to protect your design and prolong its longevity.
By mastering the techniques involved in achieving ombre nails and following these guidelines, you can create a captivating and eye-catching manicure that will leave others in awe.
Choosing the right colors for your ombre nails
Enhancing Your Nail Extensions with Stunning Gradient Effects
Imagine walking into a nail salon and being greeted by an array of vibrant colors seamlessly blended together on someone’s nails. This is the mesmerizing beauty of ombre nails, a popular trend that has taken the nail industry by storm. In this section, we will explore how ombre nails are achieved and discuss the importance of choosing the right colors to achieve your desired gradient effect.
To create stunning ombre nails, technicians utilize various techniques such as sponging or brushing to blend two or more complementary colors smoothly. One popular method involves using a makeup sponge to apply different shades onto each nail, gradually fading from one color to another. By layering multiple coats and strategically blending the polish, a flawless gradient effect can be achieved.
When it comes to selecting colors for your ombre nails, the possibilities are endless. It’s important to consider factors such as skin tone, personal style preferences, and occasion when making your choices. For instance, if you have fair skin tones, opting for soft pastel hues like baby pink transitioning into lilac can provide an elegant yet subtle look. On the other hand, those with darker complexions may want to experiment with bold jewel tones like emerald green fading into deep sapphire blue for a striking contrast.
Now let’s delve deeper into some key considerations when choosing the right colors for your ombre nails:
- Consider your skin tone and select shades that complement it.
- Take into account any specific events or occasions where you plan on showcasing your ombre nails.
- Experiment with contrasting or harmonious color schemes based on personal preference.
- Don’t be afraid to mix and match different finishes such as matte and shimmer for added dimension.
In addition to color selection, texture can also play a significant role in achieving visually appealing ombre effects. A three-column table could further illustrate this concept:
| Color Palette | Finish | Texture |
|---|---|---|
| Pastel Dream | Matte | Smooth and velvety |
| Electric Vibes | Shimmer | Sparkling and reflective |
| Dark Romance | Glossy | Sleek and high-shine |
By carefully considering these factors, you can create a truly unique ombre nail design that suits your individual style.
Transitioning seamlessly into the subsequent section about “Prepping your nails for the ombre application,” it is essential to ensure proper nail preparation before diving into the world of gradient effects.
Prepping your nails for the ombre application
Enhancing the Beauty of Your Nail Extensions: Prepping for Ombre Application
Imagine this scenario: You have carefully chosen your ombre nail colors, and you are excited to create a stunning gradient effect on your nail extensions. However, before diving into the application process, it is crucial to adequately prepare your nails. This section will guide you through the necessary steps to ensure optimal results.
Firstly, start by removing any existing polish from your nail extensions using a gentle acetone-free remover. This step allows for better adherence of the ombre colors and prevents any unwanted blending with previous shades. Afterward, file and shape your extensions according to your desired style. Whether you prefer square or rounded tips, make sure they are even in length and smooth around the edges.
Next, gently buff the surface of each extension using a fine-grit buffer block. This helps remove any shine or residue left behind during filing and creates a slightly rough texture that promotes better color adhesion. Be cautious not to over-buff as it can weaken the structure of your nail extensions.
To further ensure long-lasting wear, apply a high-quality primer specifically designed for acrylic or gel nails onto each extension. This essential pre-application step maximizes both color retention and durability while preventing lifting or chipping.
Now that your nails are primed and ready, let’s delve into different techniques to create captivating ombre effects on these beautifully prepped surfaces. But before we explore those methods, let us examine some key benefits of embracing ombre nails:
- Versatility: With countless combinations available, ombre nails offer endless possibilities to express your creativity.
- Elegance: The seamless transition between two or more hues creates an elegant look suitable for various occasions.
- Illusion of Length: By incorporating lighter shades at the tips, ombre nails can visually elongate shorter natural nails or extensions.
- Trendiness: Ombre nails have become a popular trend, embraced by fashion enthusiasts and beauty aficionados alike.
In addition to these benefits, mastering the art of ombre nail application can be achieved through various techniques. The subsequent section will explore different methods that allow you to effortlessly achieve stunning gradient effects on your beautifully prepped extensions. So let’s continue our journey into the world of ombre nails!
Different techniques to create ombre effects on your nails
Enhancing Your Nail Extensions with Stunning Gradient Effects
Imagine you have an upcoming special event and want to add a touch of elegance to your nail extensions. Ombre nails, characterized by a smooth transition of colors from one shade to another, can be the perfect choice for achieving that eye-catching look. By blending different hues harmoniously, ombre nails offer a unique and sophisticated style that is sure to leave an impression.
To create stunning gradient effects on your nail extensions, it’s essential to understand the various techniques involved. Here are three popular methods used by professionals:
-
Sponge Technique: This technique involves using a small makeup sponge or a dedicated ombre sponge tool. After applying your base coat and choosing two or more complementary polish shades, carefully paint each color onto the sponge in horizontal lines. Gently press the sponge onto your prepared nail surface in a rolling motion until the desired effect is achieved.
-
Brush Blending Technique: With this method, start by painting each selected color directly onto your nail as separate vertical stripes. Using a clean brush (preferably flat), gently blend the colors together while they’re still wet. The result will be an effortless gradient where the transitions between colors appear seamless.
-
Dip Powder Technique: Ideal for those who prefer long-lasting results, dip powder allows you to achieve beautiful ombre nails without any complicated steps. First, apply a base coat followed by dipping your fingernail into different colored powders consecutively, ensuring proper coverage at each step. Repeat if necessary to intensify the gradient effect before sealing it with a topcoat.
Creating exquisite ombre nails not only requires skill but also demands attention throughout the application process. To help you avoid common mistakes and ensure longevity, here are some tips:
- Use thin layers of polish or powder when building up colors for better control and smoother gradients.
- Seal each layer with appropriate topcoats to protect the design and enhance its longevity.
- Avoid excessive filing during shaping, as it can disrupt the gradient effect or remove layers of color prematurely.
- Regularly moisturize your nails and cuticles to keep them healthy and prevent any drying or chipping.
With these techniques in mind, you’re now ready to experiment with ombre effects on your nail extensions.
Tips for maintaining the longevity of your ombre nails
Creating stunning gradient effects on your nail extensions can take your ombre nails to the next level. By blending different colors seamlessly, you can achieve a captivating and eye-catching look. In this section, we will explore some techniques that you can use to create beautiful ombre effects on your nails.
One popular technique is the sponge method. To achieve this effect, start by applying a base color to your nail extensions. Then, choose two or more complementary shades that you would like to blend together for the ombre effect. Apply each of these colors onto a makeup sponge in horizontal stripes, ensuring they slightly overlap. Gently press the sponge onto your nail extensions and dab it lightly until the desired gradient effect is achieved.
Another technique involves using a brush to paint the colors directly onto the nail extensions. Start with a base color and apply it evenly across all nails. Next, select another shade that complements the base color and load up a small amount of it onto a flat brush. Begin painting from one side of the nail extension towards the center, gradually fading out as you reach the middle point. Repeat this process from the other side of the extension until both sides meet at an even blend.
To help you maintain your ombre nails’ longevity and keep them looking flawless for longer periods, consider following these tips:
- Avoid exposing your ombre nails to excessive moisture or harsh chemicals.
- Use gloves when doing household chores or tasks that may damage your manicure.
- Apply topcoat regularly to seal in and protect the gradient design.
- Schedule regular touch-ups or maintenance appointments with a professional nail technician.
By utilizing these techniques and taking proper care of your ombre nails, you can enjoy their stunning beauty for an extended period.
- Enhance your overall appearance with mesmerizing gradient effects
- Stand out from traditional single-color manicures
- Express creativity through unique combinations of shades
- Boost self-confidence with a trendy and fashionable look
| Technique | Benefits | Challenges |
|---|---|---|
| Sponge method | Seamlessly blends colors for a smooth gradient effect | Requires practice to achieve desired results |
| Brush application | Allows more control over color placement | Requires precision and steady hand |
| Proper maintenance | Extends the lifespan of your ombre nails | Requires dedication and regular care |
Transitioning into the subsequent section about inspiring ombre nail design ideas, exploring various combinations of colors and designs can further enhance the aesthetic appeal of your ombre nails.
Inspiring ombre nail design ideas
Enhancing the longevity of your ombre nails is crucial to maintaining their stunning gradient effects. By following a few simple tips and tricks, you can ensure that your nail extensions remain beautiful for an extended period of time.
One effective way to prolong the life of your ombre nails is by avoiding activities that may cause damage or chipping. For instance, refrain from using your nails as tools for opening cans or scratching surfaces. Additionally, it’s important to wear gloves when engaging in household chores or working with harsh chemicals, as these can weaken the integrity of your nail extensions.
Proper nail care plays a significant role in preserving the vibrancy of your ombre design. Regularly moisturizing your cuticles and applying nourishing oils not only keeps them healthy but also prevents dryness and cracking around the edges of the extension. It is advisable to avoid excessive exposure to water, especially hot water, as it can lead to lifting or peeling of the nail extensions.
To further enhance the longevity of your ombre nails, consider scheduling regular touch-ups with a professional technician who specializes in nail extensions. They will be able to inspect and repair any minor damages before they escalate into more significant issues. Moreover, seeking professional advice on proper aftercare techniques specific to your type of nail extensions can significantly extend their lifespan.
Here are some key points to remember:
- Avoid activities that may cause damage or chipping.
- Moisturize cuticles regularly and protect against excessive exposure to water.
- Schedule regular touch-ups with a professional technician specializing in nail extensions.
By implementing these maintenance practices and adopting a cautious approach towards daily activities, you can enjoy long-lasting ombre nails that showcase their stunning gradient effects flawlessly.
| Key Points |
|---|
| – Avoid damaging activities |
| – Moisturize cuticles regularly |
| – Protect against excessive water exposure |
| – Schedule regular touch-ups |
Table: Tips for Maintaining Longevity of Ombre Nails
Remember, investing time and effort into proper care will pay off in the long run. By following these guidelines, you can ensure that your ombre nails remain a stunning accessory for weeks to come.